Use vertical 9:16 video exported at 1080 × 1920 pixels in MP4/H.264. That’s the format that fills the entire For You feed, with no black bars and no forced cropping. Square (1:1) and landscape (16:9) both upload fine, but TikTok letterboxes or crops them, which shrinks your subject and costs you visual real estate you can’t get back.
TL;DR:
- TikTok’s native format is 9:16 at 1080 × 1920 pixels, filling the entire screen and maximizing viewer engagement.
- Keep essential content and faces away from the right edge and bottom caption zone to prevent cropping or overlay obstruction.
- Use auto-reframe tools or manually crop horizontal footage to 9:16 before export, and always preview the final upload on a device.
- Upload shorter clips between 15 and 60 seconds for optimal engagement, and do not rely on 4K uploads since TikTok downscales to 1080p.
Table of Contents
- What Is the Ideal TikTok Aspect Ratio and Resolution?
- Quick Specs: Resolution, Formats, Bitrate, and Upload Limits
- Where Does TikTok’s UI Cover Your Video?
- How Do You Reframe Horizontal Video for TikTok?
- What Export Settings Avoid Compression and Cropping Issues?
- Why Is My TikTok Video Cropped or Showing Black Bars?
- Your Pre-Upload Checklist
- TechVideoBlog’s Take on Vertical-First Workflows
- Find Tools That Handle TikTok Formatting for You
- Sources
- FAQ
What Is the Ideal TikTok Aspect Ratio and Resolution?
TikTok’s native format is 9:16, and the exact spec is 1080 × 1920 pixels. That’s not an arbitrary number. It matches the physical proportions of most smartphone screens, so a properly formatted clip fills the display edge to edge in the For You feed with zero wasted space.
That makes sense once you think about how TikTok’s algorithm works: a video that fills the frame keeps a viewer’s eyes locked on the content instead of on gray bars at the top and bottom, and every extra half-second of attention feeds the completion rate the algorithm rewards.
Square and landscape formats aren’t banned. TikTok accepts 1:1 and 16:9 uploads, but it displays both with letterboxing or cropping depending on the source dimensions. A 16:9 landscape clip, for instance, often gets squeezed into the center of the vertical frame with black space above and below, which is precisely the visual dead zone that makes scrollers swipe past instead of stopping. If you’re formatting for TikTok specifically, 9:16 isn’t one option among equals. It’s the format everything else compromises against.
Quick Specs: Resolution, Formats, Bitrate, and Upload Limits
Before you brief an editor or set up an export preset, here’s the compact spec sheet worth bookmarking.
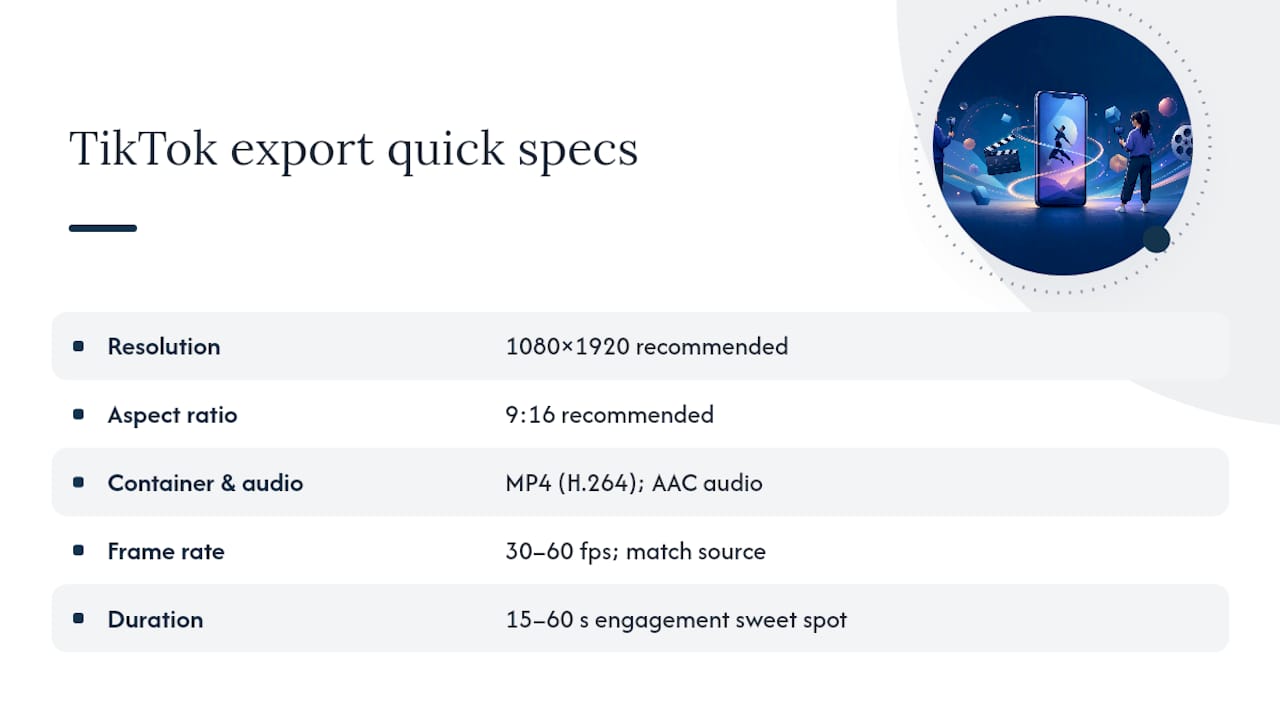
Resolution: 1080 × 1920 is the recommended target. TikTok will accept video down to 720 × 1280, but that’s a floor, not a goal. Upload in 4K and TikTok typically downscales it to 1080p anyway, so shooting or exporting beyond that resolution rarely buys you anything.
Aspect ratios: 9:16 is recommended; 1:1 and 16:9 are supported but display with letterboxing or cropping.
Containers and codecs: MP4 with H.264 video compression is the safest bet. MOV files are accepted too, but they run larger and offer no real quality advantage once TikTok re-encodes them on upload. Audio should be AAC.
Frame rate: Export at 30 to 60 fps, and match your source footage’s frame rate rather than converting it. Frame rate conversion introduces variable frame rate (VFR) artifacts that can cause stuttering or audio drift after TikTok processes the file.
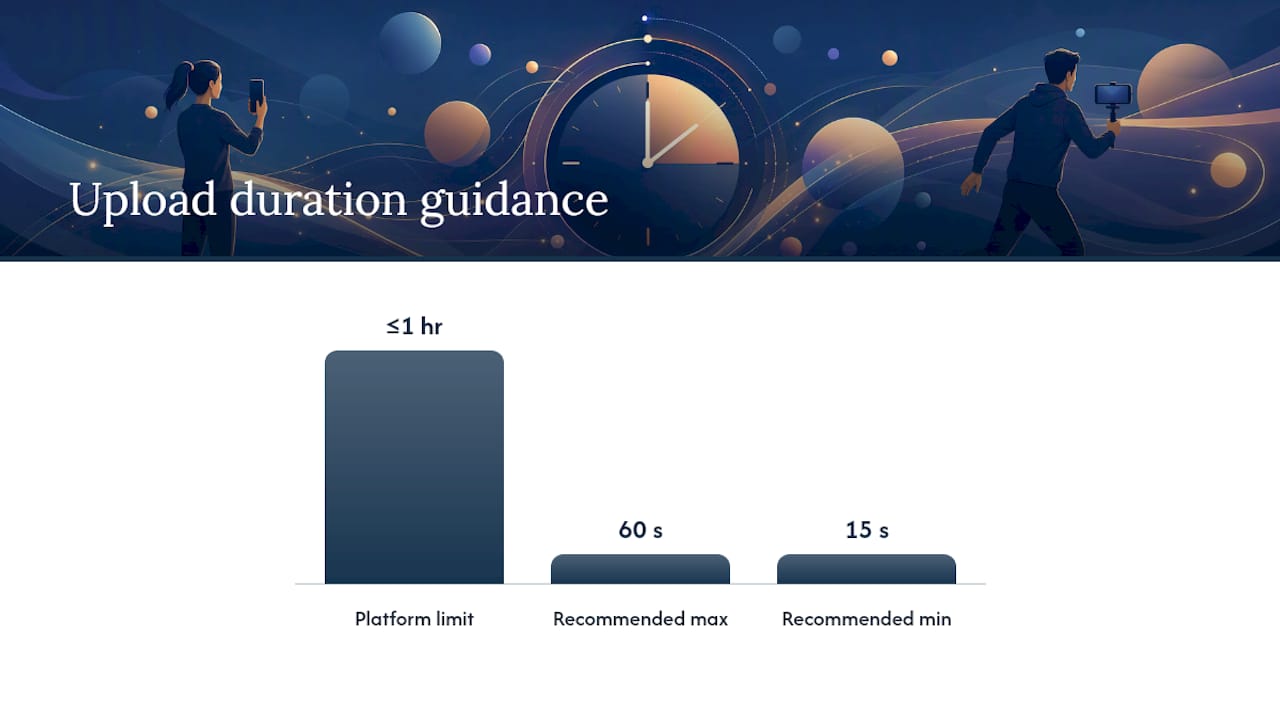
Duration: In-app recording tops out at 10 minutes, and many accounts can upload files up to 60 minutes long. That said, engagement data still points to a 15 to 60 second sweet spot for For You feed performance, with a practical floor of about 3 seconds for anything to register as a real post.
Upload size: This is where creators get tripped up. Mobile app caps differ from the web uploader, and even mobile caps vary by operating system and account type. If your export is unusually large, don’t assume the app will handle it gracefully. Compress intelligently instead of relying on TikTok’s own compression to save you.
Where Does TikTok’s UI Cover Your Video?
TikTok’s interface sits on top of your video, not around it, which means key visual elements can vanish behind icons if you’re not planning for them. The right-side column carries the profile photo, like button, comment button, share icon, and sound disc. The bottom band holds the caption text, username, and hashtags. A status bar sits at the very top on most devices.
None of these overlays are pixel-identical across every phone, since screen sizes and OS versions shift things slightly. But a few practical rules hold up consistently:
- Keep essential text or faces out of the far right edge, roughly the outer 130 pixels of a 1080-pixel-wide frame, where the action icon stack lives.
- Leave breathing room at the bottom, about 250 pixels up from the base, so captions and usernames don’t collide with your on-screen text.
- Keep your subject centered horizontally when possible. Off-center framing that looked fine in a landscape edit often lands a face right behind the comment icon in vertical.
- Remember that your profile grid crop is different from your feed crop. TikTok crops grid thumbnails more tightly, so a subject positioned safely in the feed can get clipped in your profile preview. Center faces and key text as close to the middle of the frame as the composition allows, so both crops stay clean.
Pro Tip: Never trust how a clip looks in your editing software’s preview window. Export the final file, upload it, and actually look at it in the TikTok app on your own phone before you publish. This one habit catches the crop, sync, and safe-zone issues that only surface in TikTok’s native player.
How Do You Reframe Horizontal Video for TikTok?
Most creators aren’t shooting vertical from scratch. They’re taking existing 16:9 footage, whether from a podcast camera, a webinar recording, or an old YouTube video, and adapting it for TikTok. Here’s the workflow that keeps your subject intact through the conversion.
- Set your canvas to 1080 × 1920. Whatever editor you’re using, create a new project or sequence at this resolution before you import anything. Building the timeline in the wrong aspect ratio and resizing later almost always introduces quality loss.
- Choose your reframing method. Subject-aware auto-reframe tools, common in mainstream editors like Adobe Express, track a speaker or focal point and keep them centered automatically. Manual crop and reposition gives you more control for complex shots with multiple people. A third option, compositing your horizontal footage over a blurred or graphic background, works well when the original framing can’t be cropped without cutting someone off.
- Reposition captions and text. Once your footage is reframed, move any burned-in subtitles or graphics out of the safe-zone exclusion areas discussed above. Text that worked in the original 16:9 layout frequently lands directly under the caption band or behind the action icons after conversion.
- Export and preview on-device. Use the settings from the quick specs table, then check the final file on your phone, not just your desktop monitor.
For quick single-clip turnaround, a mobile app with a one-tap 9:16 preset gets you there fastest. For batch work across a dozen episodes, a desktop auto-reframing tool that processes footage in bulk saves far more time than reframing each clip by hand, though it’s worth spot-checking the output before mass-exporting.
What Export Settings Avoid Compression and Cropping Issues?
The gap between a clip that looks sharp on TikTok and one that looks muddy usually comes down to export choices made before the file ever reaches the platform.
Stick with MP4 using H.264 compression and AAC audio. This combination gives TikTok the smallest file size for the visual quality it holds, and it’s the format TikTok’s own processing pipeline handles most predictably. MOV files work too, but they’re larger for no real benefit since TikTok re-encodes everything on upload anyway.
For bitrate, a variable bitrate (VBR) in the range of roughly 8 to 12 Mbps for 1080 × 1920 footage gives you solid quality without inflating file size unnecessarily. Export at your source frame rate rather than converting up or down, and resist the urge to upscale lower-resolution footage to 4K before uploading. It won’t add detail that wasn’t in the original, and TikTok downscales 4K uploads to 1080p regardless, so you’re just adding processing overhead and larger file transfers for no visual payoff.
A few things worth double-checking before export:
- Verify your rotation metadata is clear. A file shot vertically on one device but tagged with a horizontal rotation flag can display sideways or with unexpected black bars.
- Skip unnecessary upscaling. It rarely improves how a video looks and often makes compression artifacts more visible.
- Match your audio sample rate to your project settings to avoid sync drift during TikTok’s re-encode.
TikTok’s own duration data shows a wide gap between what’s technically allowed and what performs best: the platform permits uploads up to an hour for many accounts, yet engagement guidance still favors clips between 15 and 60 seconds for feed performance. Export settings matter more at the shorter end, since compression artifacts are more noticeable in a tightly cropped, fast-paced clip than in a longer, slower one.
Why Is My TikTok Video Cropped or Showing Black Bars?
Most formatting complaints trace back to one of a handful of causes, and each has a fast fix.
- Black bars on upload: Usually means your canvas wasn’t set to 1080 × 1920 before export, or your file carries a rotation flag TikTok is reading incorrectly. Re-export at the correct canvas size and clear the rotation metadata.
- Faces or text cut off: Almost always a safe-zone issue. Reposition the subject away from the edges and re-render rather than trying to patch the existing export.
- Pixelation after upload: Often caused by uploading a low-bitrate file that TikTok’s compression pushes even lower. Re-export from your original source project at a higher bitrate instead of re-compressing the already-compressed upload.
- Audio out of sync: Typically a frame rate mismatch between your source footage and your export settings. Match them exactly rather than converting.
Before you post anything, preview the exported file directly in the TikTok app, and check it on more than one device if you can. When in doubt about whether a fix requires a full re-encode or just a quick re-export, the rule of thumb is simple: metadata problems (rotation, container) usually just need a re-export, while quality problems (pixelation, bitrate) need you to go back to the source project.
Your Pre-Upload Checklist
Run through this before every post. It takes less time than re-uploading a corrected version after the fact.
| Check | Target |
|---|---|
| Canvas size | 1080 × 1920 |
| Aspect ratio | 9:16 |
| Container/codec | MP4, H.264 |
| Audio codec | AAC |
| Frame rate | Matches source footage |
| Safe zones | Text and faces clear of right-side icons and bottom caption band |
| On-device preview | Done before publishing |
Do: export at source frame rate, keep captions centered, preview on your own phone. Don’t: upscale to 4K unnecessarily, trust your desktop preview as the final word, or leave rotation metadata unchecked.
TechVideoBlog’s Take on Vertical-First Workflows
Reframing horizontal footage works, and modern auto-reframe tools handle straightforward talking-head shots well. But every hour spent fixing a bad crop is an hour you didn’t spend shooting vertical in the first place. If you’re planning a shoot with TikTok as the primary destination, capture in 9:16 from the start and treat reframing as a fallback for repurposed content, not your default workflow. Techvideoblog’s tool comparisons exist for exactly this decision: knowing when automated reframing saves real time versus when it just moves the cropping problem downstream.
— H
Find Tools That Handle TikTok Formatting for You
Manually checking safe zones and re-exporting botched crops eats into time you could spend making more content. Hands-on tests on editors, auto-reframe tools, and caption generators enable picking based on real export results instead of a vendor’s marketing page.

If reframing horizontal footage is a regular part of your workflow, our breakdown of auto-reframing tools compares how different options handle subject tracking and batch exports. Our guide to changing aspect ratio without losing quality walks through the export settings that prevent the compression issues covered above. And if you’re repurposing TikTok clips into longer-form content on other platforms, Voclify’s guide to turning short-form fans into long-form subscribers covers the length and framing trade-offs that come with that funnel. Visit the Techvideoblog directory to see current tool tests before you commit to an editing stack.
Sources
FAQ
What Aspect Ratio Is 1920×1080?
1920×1080 is 16:9, a landscape format. On TikTok, it’s supported but displays with letterboxing since the platform’s native format is vertical 9:16.
What Is the Best Aspect Ratio for TikTok?
The best aspect ratio is 9:16 at 1080 × 1920 pixels. It fills the entire For You feed screen without bars or cropping, which square and landscape formats can’t do.
How Do I Change the Aspect Ratio on TikTok?
TikTok doesn’t let you change aspect ratio after uploading, so you need to reframe your footage to 9:16 in an editor before posting. Set your project canvas to 1080 × 1920, use auto-reframe or manual cropping to keep your subject centered, then export as MP4.
What Is the Recommended Post Size for TikTok in 2026?
The recommended size remains 1080 × 1920 pixels at a 9:16 aspect ratio, exported as MP4 with AAC audio. This spec hasn’t shifted because it’s tied to smartphone screen proportions, not a platform trend.
Does Uploading in 4K Improve TikTok Video Quality?
Not meaningfully. TikTok downscales 4K uploads to 1080p during processing, so shooting or exporting beyond that resolution adds file size without adding visible quality.