Remove silent gaps from recordings while keeping natural pauses. Compare timeline control, thresholds and export options. Record a short sample with the microphone, speakers and screen layout you normally use. Check the original tracks, transcript and edited export. Include setup, upload and correction time in your comparison.
Privacy check: A browser interface does not prove that processing stays on your device. Verify the provider’s architecture and data handling before uploading confidential recordings.
Research guide. Vendor information and third-party reports are distinct from our own test results. See how we evaluate tools. We may earn a commission from qualifying purchases through affiliate links. Affiliate disclosure.
TL;DR:
- Check whether this tool uploads footage or processes it on-device. A browser interface is not evidence of local processing; confirm the current data-handling policy before using confidential footage.
- Long-form content benefits from tools like TimeBolt for speed or Autocut for seamless editor integration, especially when exporting timeline files to DaVinci Resolve or Premiere.
- Accurate silence removal requires setting the threshold around -40 dB, minimum silence duration between 0.3 and 2 seconds, and adding padding to prevent choppy cuts.
- Processing limits, such as a cap of 80 silent intervals in some tools, might require splitting lengthy recordings to avoid errors or incomplete detection.
- Free options like VidClean or NeuralFalcon suit testing or one-off edits, but paid tools often deliver faster, more refined results for high-volume or professional workflows.
Table of Contents
- What Does Auto Remove Silence Actually Mean?
- Which Silence Removal Tool Fits Your Workflow?
- How Do You Set Threshold, Gap, and Padding Correctly?
- What’s the Right Workflow From Upload to Export?
- How Private Is Your File, and What Are the Limits?
- Use the directory to compare workflow options, then confirm current features and terms with the provider.
- The Shortlist That Actually Matches How Creators Work
- Compare Silence-Removal Tools Before You Commit
- FAQ
What Does Auto Remove Silence Actually Mean?
Automatic silence detection works by scanning an audio or video track for stretches where volume drops below a set decibel threshold for longer than a minimum duration, then cutting those gaps out. That’s the whole mechanism behind every silence removal tool on this list, whether it’s a free browser app or a desktop plugin. The industry term for this is silence detection and removal, though most creators just call it “auto cut silence” or a “smart cut” workflow.
Here’s a snapshot of the seven tools creators ask about most, organized by the job each one actually solves.
- Check whether this tool uploads footage or processes it on-device. A browser interface is not evidence of local processing; confirm the current data-handling policy before using confidential footage.
- TimeBolt: Built for speed on long recordings. It bundles filler-word removal with jump-cut silence detection, which makes it a natural fit for podcasters and educators trimming hour-long sessions.
- Recut: A desktop app for Mac and Windows that leans into manual fine-tuning after the automatic pass, useful if you want tighter control over each cut before it hits your timeline.
- SavvyCut: A browser tool aimed at vloggers and streamers who need instant jump cuts on short clips rather than deep customization.
- Autocut: An open-source project that detects spoken regions and exports either an MP4 or an FCPXML timeline for editors, preserving source timecode so you can keep refining in your editor of choice.
- NeuralFalcon: A community-hosted demo on Hugging Face Spaces, good for testing the concept on a short audio file before committing to a full tool.
- BlitzCut: An iPhone and Mac app built around frame-accurate cuts, which matters if you’re editing on mobile and need precision without a full desktop suite.
Export options split roughly into three lanes: direct MP4/MOV output for social clips, M4A or WAV for audio-only podcast workflows, and FCPXML or timeline exports for anyone finishing in a full editor. VidClean processes entirely in your browser and shows before/after duration stats so you can see the reduction immediately, while tools like NeuralFalcon operate more as free-processing demos with looser production guarantees.
Which Silence Removal Tool Fits Your Workflow?
| Tool | Best For | Processing Mode | File Types / Export | Speed | Pricing / Free Limits | Fine-Tuning Controls |
|---|---|---|---|---|---|---|
| VidClean | Quick browser cleanup, no signup | Local/browser | MP4, MP3/WAV | Near-instant on short clips | Free | Threshold, min gap, buffer padding, preview |
| TimeBolt | Long-form batch processing | Local desktop | MP4, MOV, filler-word cuts | Claims an hour of video in about 13 seconds | Paid, free trial | Threshold, jump-cut sensitivity |
| Recut | Desktop editor integration | Local desktop | MP4, MOV, editor handoff | Manual review adds time | Paid | Per-cut manual adjustment |
| SavvyCut | Fast social clips | Browser | MP4 | Fast for short clips | Free tier, paid upgrades | Basic threshold |
| Autocut | FCPXML/timeline export | Local, open-source | MP4, FCPXML | Depends on local hardware | Free (open-source) | Preview, drag edge handles |
| NeuralFalcon | Quick experiments | Cloud (Hugging Face) | WAV/MP3 | Demo-speed, not production | Free | Minimal |
| BlitzCut | Mobile frame-accurate cuts | Local (iPhone/Mac) | MP4 | Fast on-device | Paid | Frame-level trimming |
Check whether this tool uploads footage or processes it on-device. A browser interface is not evidence of local processing; confirm the current data-handling policy before using confidential footage.
How Do You Set Threshold, Gap, and Padding Correctly?
Getting silence removal to sound natural instead of choppy comes down to three settings, and getting them wrong is the single biggest reason auto cuts feel jarring.
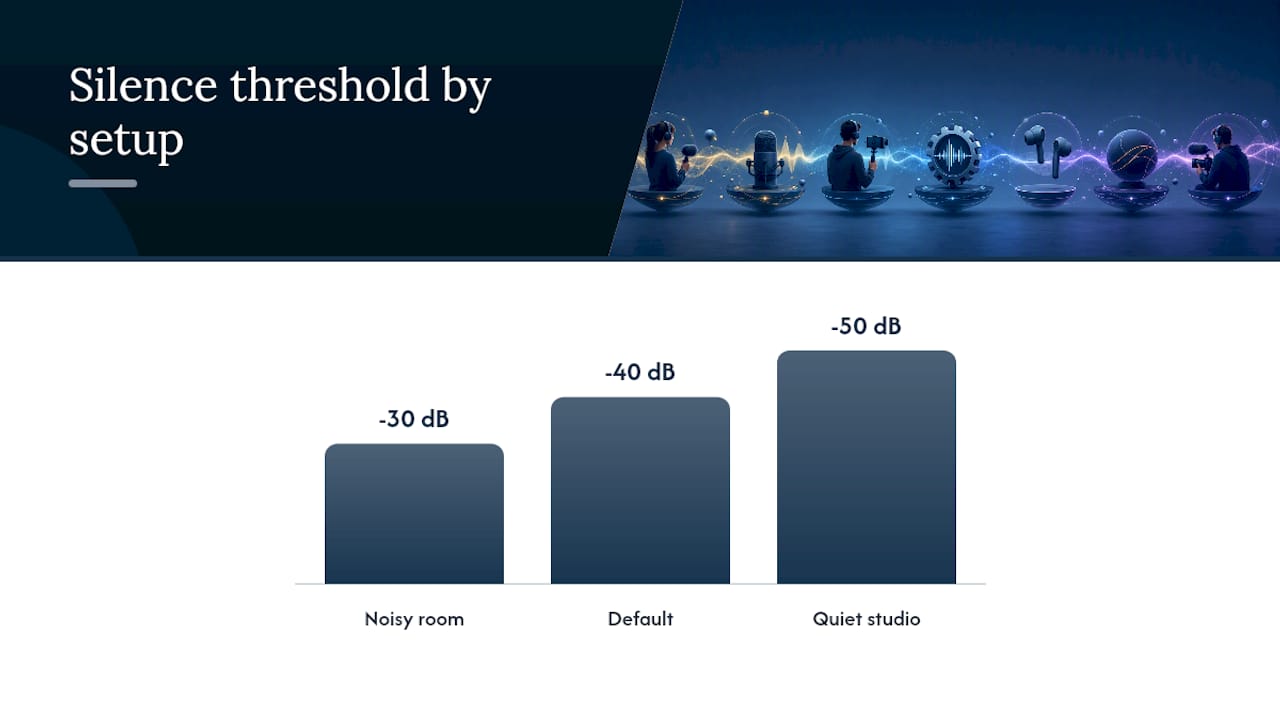
- Set your dB threshold first. Start at -40 dB, the default most tools including FFmpeg’s silencedetect filter build in. Move to -30 dB if you’re recording in a noisy room where the mic picks up hum or traffic. Drop to -50 dB for a quiet studio setup, where even small breaths shouldn’t trigger a cut.
- Pick a minimum silence length. Somewhere between 0.3 and 2.0 seconds works for most speech. Shorter minimums catch more micro-pauses but risk clipping natural breathing; longer minimums leave more air but protect rhythm in conversational podcasts.
- Add padding around each cut. A buffer of 0.1 to 0.3 seconds before and after a cut avoids the abrupt pop that comes from slicing mid-breath. VidClean, for example, defaults to a 0.3 second buffer before speech and 0.1 seconds after it, which is a reasonable starting point to copy.
Pro Tip: If a tool stops mid-job or throws an error, check whether it hit an interval cap. Some silence detectors halt after finding more than 80 separate silent gaps to avoid runaway processing. Raising your minimum silence length usually fixes it by reducing the number of detected intervals.
Run a quick checklist before you commit to settings: What’s your room’s noise floor? Is this a video (where padding matters more) or audio-only (where you can trim tighter)? Are you cutting for social pacing or preserving a natural conversational feel? Answer those three questions and the right threshold usually becomes obvious.
What’s the Right Workflow From Upload to Export?
The path differs depending on whether you’re finishing entirely in a browser tool or handing off to a full editor.
- Quick web tool path: Upload your file, let the tool auto-detect gaps, then preview the cuts before touching anything.
- Adjust threshold, minimum gap, and padding based on what the preview reveals, tightening or loosening until the pacing sounds right.
- Export directly to MP4 or M4A once you’re satisfied, skipping any further editing step.
- Editor pipeline path: Run detection in a tool like Autocut, then export the result as an FCPXML or timeline file instead of a flattened video.
- Import that timeline into Premiere or DaVinci Resolve for color, sound design, and final polish without redoing the silence pass.
- For long files, split into segments first if your tool has a processing window limit, then stitch the cleaned segments back together on export.
How Private Is Your File, and What Are the Limits?
Processing mode determines what happens to your file. Local and browser-based tools, including VidClean, never upload your recording to a server, which matters if you’re editing client audio or anything under an NDA. Cloud tools upload your file temporarily and typically delete it after a retention window.
- VidClean deletes processed files about 90 minutes after processing.
- Some detectors cap out around 80 detected silent intervals per job before halting, a guardrail against runaway processing on very choppy audio.
- TimeBolt’s vendor claims roughly 13 seconds to process an hour of video, though your mileage depends on file size and hardware.
- Re-encoding kicks in for video cuts specifically, since frames need to be spliced cleanly; audio-only tools often run a single pass with no re-encode.
Split long recordings into chunks if a tool has a processing window limit, and always check the before/after stats a tool reports (VidClean shows exact duration and percentage reduction) so you know how much time you actually saved.
How to Evaluate This Workflow
Record a short sample with the microphone, speakers and screen layout you normally use. Check the original tracks, transcript and edited export. Include setup, upload and correction time in your comparison.
This is a suggested evaluation process, not a report of a completed TechVideoBlog benchmark.
The Shortlist That Actually Matches How Creators Work
Most silence-removal advice treats every creator’s job the same, and that’s the wrong frame. A podcaster cleaning a 90-minute episode has nothing in common with a streamer clipping a 30-second highlight, yet both get pointed to the same “best silence remover” list.
The setting most people get wrong isn’t threshold, it’s minimum gap length. Creators default to the shortest gap their tool allows, thinking tighter is better, and end up with choppy audio that clips natural breathing. A slightly longer minimum, paired with real padding, almost always sounds more professional than an aggressive cut with none.
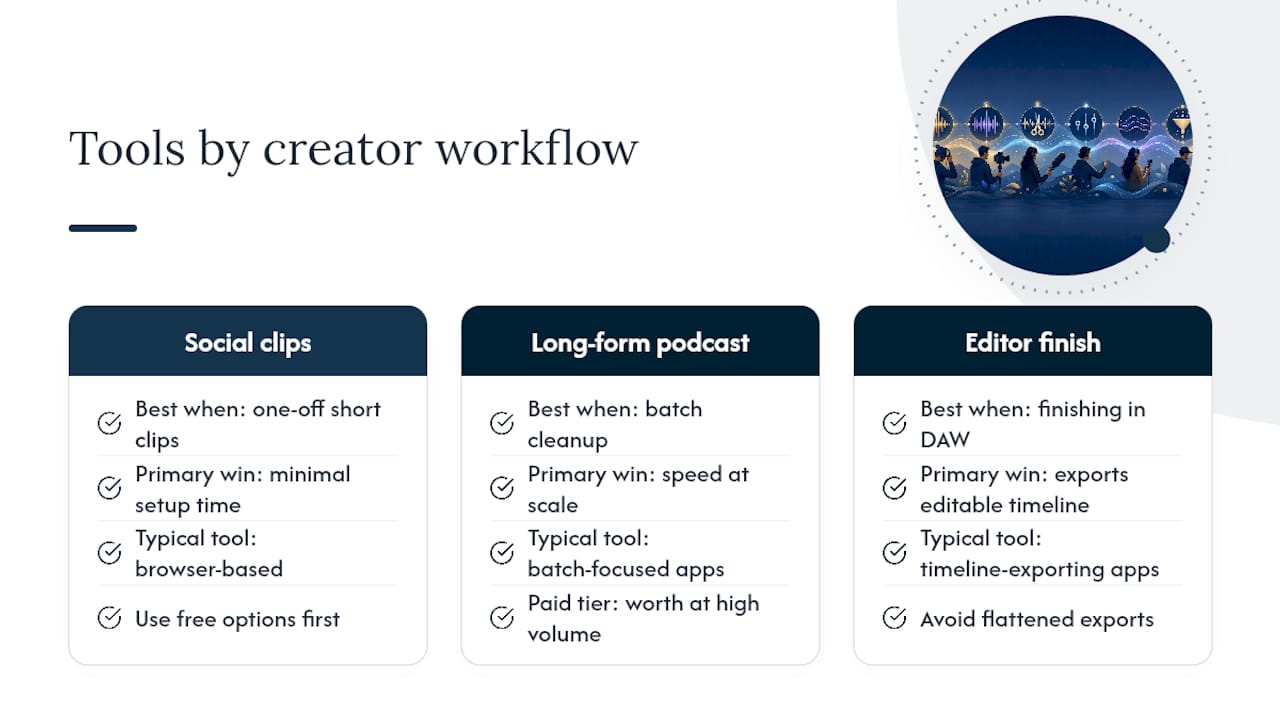
If you’re mapping tools to jobs: browser tools win for one-off social clips because setup time matters more than raw power. Batch-focused tools earn their keep on long-form podcast cleanup where speed compounds across dozens of episodes. And anything that exports a timeline, not a flattened file, is the only sane choice once you’re finishing in a real editor. Test the free options first. The paid tiers only earn their price once your volume makes the time savings measurable.
Compare Silence-Removal Tools Before You Commit
Use the directory to compare workflow options, then confirm current features and terms with the provider.

Use the directory to compare workflow options, then confirm current features and terms with the provider.
FAQ
How Can I Remove Silence From Audio?
Use a silence detector set to a threshold around -40 dB with a minimum gap of 0.3 to 2.0 seconds, then preview the cuts before exporting; browser tools like VidClean handle this without any software install.
How Can I Automatically Remove Silence in Audacity?
Audacity includes a built-in Truncate Silence effect under the Effect menu, where you set a threshold in dB and a minimum duration, though it lacks the preview-before-export step that dedicated tools like VidClean or Autocut offer.
How Can I Automatically Remove Silences in Premiere Pro?
Premiere Pro doesn’t have a native one-click silence remover, so most editors detect silence in a separate tool like Autocut first, then import the result as an FCPXML timeline to finish cutting inside Premiere.
What’s a Free Tool That Can Remove Silence From Videos?
VidClean processes video locally in your browser at no cost, and NeuralFalcon’s Hugging Face Space offers a free demo environment for testing silence removal on shorter audio files.
What File Types Can I Export After Removing Silence?
Most tools export standard MP4 or MOV for video and MP3 or WAV for audio, while Autocut additionally supports FCPXML export so editors can finish the cut inside Premiere or DaVinci Resolve.