If you’re cleaning up noisy footage right now, here’s the short answer: use Pollo AI denoiser for a quick free fix on a short social clip, UniFab Denoise AI or Topaz Video AI when you need high-quality restoration on 4K or 8K masters, Neat Video when you want denoise control without leaving your NLE, and pair any visual tool with ElevenLabs’ voice isolation or Adobe’s speech cleanup when the audio track is the real problem.
That mapping holds because these tools solve different problems, not the same problem at different price points.
- Best quick online fix: Pollo AI denoiser or Wink AI Video Denoiser. Fast, browser-based, but capped on length and resolution.
- Best desktop for high-quality restoration: UniFab Denoise AI or Topaz Video AI. GPU-accelerated local processing beats cloud compression for fine grain and low-light noise.
- Best NLE plugin: Neat Video. Slower to set up, but you never leave your timeline.
- Best audio-first cleanup: ElevenLabs or Adobe Enhance Speech, run alongside neural audio separation to isolate voice before you touch the picture.
Key Takeaways
The right AI noise reduction video tool depends on whether you need speed, privacy, batch scale, or plugin control, not which brand has the loudest marketing.
| Point | Details |
|---|---|
| Match tool to constraint | Choose based on footage type, privacy needs, and batch size, not brand popularity. |
| Test on motion, not stills | Flicker and smearing often appear only during playback, not in a single frame. |
| Denoise conservatively | Lower strength plus selective sharpening preserves detail better than maximum strength alone. |
| Separate audio from video cleanup | Tools like ElevenLabs and Adobe Enhance Speech handle voice isolation; video denoisers don’t touch audio. |
| Compare before subscribing | Techvideoblog verifies pricing and workflow tests across AI video tools so you can pick with real data. |
Table of Contents
- What Is the Best AI Noise Reduction Video Tool for Your Workflow?
- How Do You Choose the Right AI Denoiser for Your Footage?
- How Do You Apply AI Denoising Without Losing Detail?
- Batch Processing and Format Support Across Plugins and Standalone Tools
- What Does AI Video Denoising Actually Cost?
- Ready to Try These Tools on Your Own Footage?
- Sources
- FAQ
What Is the Best AI Noise Reduction Video Tool for Your Workflow?
Pick by constraint, not by brand reputation. Every tool here handles noise well under the right conditions and badly under the wrong ones.
| Tool | Best for | Visual quality / artifact control | Workflow integration | Speed & hardware | Price / trial | Formats & batch |
|---|---|---|---|---|---|---|
| Topaz Video AI | Quick cloud workflow with live previews | Strong on grain, moderate on heavy compression | Browser-based, standalone | Cloud, no local GPU needed | Paid, preview before download | Common formats, single-clip focus |
| UniFab Denoise AI | High-res restoration, 4K/8K batch jobs | High detail retention, minimal smearing | Standalone with cloud fallback (FabCloud) | Local GPU primary, cloud option for heavy jobs | Paid license, cloud credits available | Batch processing built in |
| Pollo AI denoiser | Fast fixes on short clips | Adequate for social-length clips, softens fine texture | Online, standalone | Cloud only | Free tier, paid for longer clips | Short-form, limited batch |
| Neat Video | Plugin-level control inside an NLE | Excellent temporal/spatial control when tuned manually | Plugin (Premiere, Resolve, others) | Local, GPU-accelerated | Paid license | Batch via host NLE |
| Wink AI Video Denoiser | Minimal-setup online denoising | Basic, convenience over precision | Online, standalone | Cloud only | Not publicly listed | Limited, short-clip oriented |
| Adobe Premiere Pro (Noise Removal / VR Denoise) | Editors who stay inside one NLE | Solid for moderate noise, less aggressive than dedicated denoisers | Native NLE effect | Local, GPU-assisted | Included with Creative Cloud subscription | Full NLE format support |
| DaVinci Resolve (Resolve Studio denoise) | Colorists needing node-based control | High control, results depend on node placement | Native, node-based | Local, GPU-heavy | One-time Resolve Studio license | Full NLE format support, batch via render queue |
| CapCut (desktop AI denoiser) | One-click cleanup for short-form content | Fast but can flatten fine detail | Native, standalone app | Local/cloud hybrid depending on platform | Free with paid tier for extras | Short-form export presets |
A few workflow notes worth knowing before you commit to one: For insights on automating video post-production, check out Automating Video Editing: Transforming Production Efficiency.
- Topaz Video AI runs its denoise models in the browser, which means no GPU drivers to manage, but longer 4K clips will eat into processing credits fast.
- UniFab Denoise AI’s local-first approach means your footage never leaves your machine unless you opt into FabCloud, which matters if you’re working with client footage under an NDA.
- Neat Video rewards patience. Its manual noise profiling takes longer than a one-click auto mode, but it catches flicker patterns that automated tools miss on timelapse and low-light interviews.
- Pollo AI denoiser and Wink AI Video Denoiser are built for speed, not archival quality. Treat them as A/B testing tools before you commit to a heavier render.
- DaVinci Resolve’s denoise node sits before or after your color grade depending on where you place it in the node tree, and that placement changes your result more than the denoise strength slider does.
Cloud tools tend to cap file size or meter usage by credits, which trades convenience for a hard ceiling on batch throughput; local GPU tools trade that convenience for privacy and a higher quality ceiling on 4K and 8K jobs.
Pro Tip: Never judge denoise strength from a still frame. Play back a 2 to 3 second motion pass at full speed. Flicker and smearing that are invisible frame-by-frame often show up the moment the footage moves, a gap most creators discover only after export.
A quick system-requirements reality check: local GPU denoisers like UniFab and Neat Video want a recent NVIDIA card with at least 8GB of VRAM for 4K work. Cloud tools like Topaz and Pollo AI sidestep that requirement entirely, at the cost of upload time and per-clip limits.
How Do You Choose the Right AI Denoiser for Your Footage?
Match the tool to the footage, not the other way around. Start with these constraints before you open any app.
- Footage type: low-light and high-ISO clips need stronger temporal denoising; compressed footage (screen recordings, downloaded social clips) needs artifact-aware tools that won’t amplify blocking.
- Target output: a 30-second social short tolerates more compression loss than an archival restoration project headed for a feature edit.
- Privacy needs: client footage under contract restrictions belongs on a local GPU tool, not a cloud upload.
- Batch size and format constraints: if you’re processing 200 clips a week, standalone batch tools with a render queue beat one-clip-at-a-time browser uploads.
- Budget and latency tolerance: free online tools cost time in upload/download cycles; paid local tools cost money upfront but process faster once set up.
Before committing to a subscription, run a few tests:
- Feed it a short clip with visible grain in the shadows and check how the preview handles the darkest areas.
- Push the denoise strength to maximum, then back off, watching for the wax-skin effect (a soft, plastic look on faces) at high settings.
- Check for edge ringing around high-contrast lines, which shows up in text overlays or window frames.
- Watch a moving section for flicker or per-frame inconsistency, not just a still.
- If the tool offers upscaling alongside denoise, test that combination separately since it stacks two aggressive processes.
Red flags to walk away from: a tool that only shows results on stock demo footage, no motion preview option, or a free trial that blocks you from downloading your own test clip.
How Do You Apply AI Denoising Without Losing Detail?
Follow this order every time, regardless of which tool you pick:
- Back up your original files before running any destructive process.
- Transcode heavily compressed source footage to an intermediate codec if your denoiser struggles with the original format.
- Run a short test clip first, not your full timeline.
- Choose a low or medium preset before jumping to maximum strength.
- Preview at full resolution, not a scaled-down thumbnail.
- Check temporal stability across a few seconds of motion.
- Batch process the full clip once the test looks clean.
- Apply a light sharpening or edge-protection pass after denoising, since most denoisers soften fine detail slightly.
- Export with a codec that matches your delivery target, not just your working format.
Preflight checklist: confirm your backup exists, update GPU drivers if you’re running a local tool, and note the exact settings from your test clip so you can replicate them across a batch.
Pro Tip: Preserve micro-texture by running denoise at a lower strength than looks perfect on screen, then apply selective sharpening only where the image needs it. Full-strength denoise plus heavy sharpening afterward tends to reintroduce the artifacts you just removed.
Common issues and fast fixes: flicker usually means you need stronger temporal (not spatial) denoising; haloing around edges means you pushed sharpening too hard after the denoise pass; loss of fine texture, especially on skin and fabric, means you should drop the strength one notch and accept slightly more grain.
Batch Processing and Format Support Across Plugins and Standalone Tools
Standalone apps like UniFab Denoise AI and Topaz Video AI build batch processing into their core workflow: point the tool at a folder, set your parameters once, and let it run overnight. That matters when you’re restoring an archive of 50 old interview tapes rather than cleaning one clip for tomorrow’s upload.
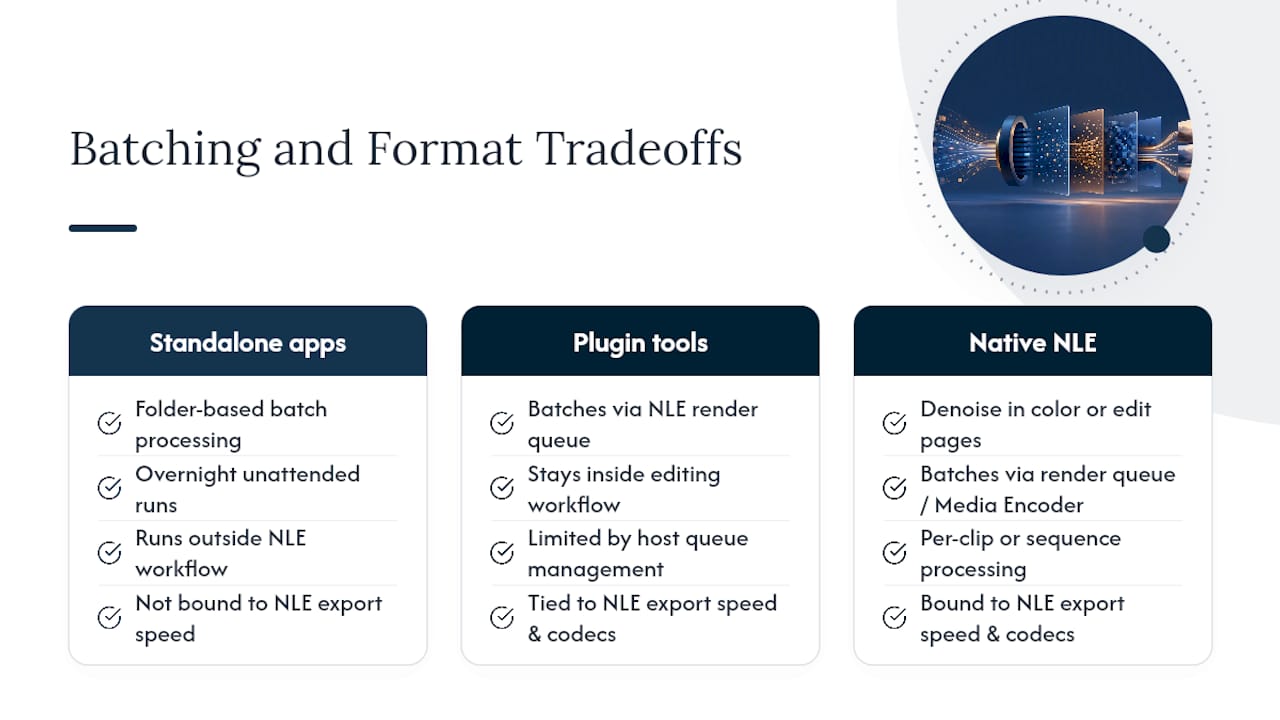
Plugin-based tools work differently. Neat Video runs inside your NLE’s render queue, whether that’s Premiere Pro, DaVinci Resolve, or After Effects, which means batch processing is limited by whatever queue management your host editor offers. The upside is you never break your editing workflow to denoise. The downside is you’re bound to your NLE’s export speed and codec support rather than a dedicated denoiser’s optimized pipeline.
Native NLE tools split the difference. DaVinci Resolve’s denoise node lives in your color page and batches through the standard render queue, while Adobe Premiere Pro’s Noise Removal and VR Denoise effects apply per-clip or across a sequence using Media Encoder for unattended batch exports.
Format support varies more than most creators expect. Cloud tools like Pollo AI denoiser and Wink AI Video Denoiser typically restrict uploads to common formats (MP4, MOV) under a file size cap, which makes them a poor fit for ProRes or camera-raw footage. Local GPU tools and NLE plugins generally handle a wider format range because they’re processing files your system already recognizes, not uploading them to a remote server first.
If your workflow spans dozens of clips a week, the plugin-versus-standalone decision often comes down to whether you’d rather manage one more app window or accept your NLE’s native limits.
What Does AI Video Denoising Actually Cost?
Pricing splits into three buckets: free tiers with hard limits, subscription licenses, and cloud credit systems that charge by usage.
Pollo AI denoiser leads with a free tier for short clips, with paid upgrades unlocking longer runtimes and higher output resolution. That structure works well for testing whether AI denoising helps your footage at all before you commit budget to a heavier tool.
Topaz Video AI runs on a paid model with browser-based processing, and because it’s cloud-hosted, expect usage to draw against processing credits rather than a flat monthly fee for unlimited renders. UniFab Denoise AI follows a license model for its local desktop app, with FabCloud credits available separately for anyone who wants to offload heavy 4K or 8K jobs without tying up their own GPU.
Neat Video and DaVinci Resolve Studio both use one-time or perpetual license purchases rather than subscriptions, which appeals to editors who want predictable long-term costs over renewing plans. Adobe Premiere Pro’s denoise tools come bundled inside a Creative Cloud subscription you’re likely already paying for if you edit in Premiere, making the marginal cost of using VR Denoise effectively zero.
CapCut’s desktop denoiser is free at the basic tier, with paid plans unlocking extra export options and higher-resolution outputs for creators publishing short-form content daily.
Before buying anything, test on a free tier or trial first. A tool that looks great on a demo reel supplied by the vendor may behave differently on your actual footage, especially footage shot in mixed lighting or heavy compression.
Editor’s Note from Techvideoblog
We test these denoisers on real footage, not vendor demo reels, tracking speed, artifact behavior, and format support across every tool we recommend.
Ready to Try These Tools on Your Own Footage?
The tools above solve one job well: cleaning noise from footage you already shot. If you’re still deciding which category of AI video tool actually fits your channel, whether that’s an editor, a caption generator, or a voice cloning tool, that’s where Techvideoblog does something the individual denoisers can’t: compare your options side by side before you spend a subscription on the wrong one.
Techvideoblog runs hands-on workflow tests on the tools creators actually use, verifying pricing and output quality instead of repeating vendor marketing copy. If your denoising workflow also touches voice cleanup, the AI vocal remover comparison walks through isolating dialogue from background noise, a step most video-only denoisers skip entirely. For editors building a full post-production stack, the AI video editor directory covers where plugin-based denoise tools fit alongside your existing NLE. Browse the full AI video tools category to see verified pricing and real output tests before you commit a subscription to any single tool.
Sources
- AI Video Denoiser – Remove Noise from Footage Online | Topaz Labs
- AI Video Denoiser: Remove Video Noise & Grain Instantly | UniFab Denoise AI
- Denoise Video: Remove Grain from Video for Free | Pollo AI
- Enhance Speech from Adobe | Free AI filter for cleaning up spoken audio
- Free Voice Isolator and Background Noise Remover
FAQ
Does AI Noise Reduction Hurt Video Quality?
Over-aggressive denoising can flatten fine detail and skin texture, but running a lower strength setting followed by selective sharpening preserves detail while still removing grain.
Can I Reduce Video Noise Without a Powerful GPU?
Yes. Cloud-based tools like Topaz Video AI and Pollo AI denoiser process footage on remote servers, so you don’t need local GPU hardware, though upload limits apply.
Is a Plugin Better Than a Standalone Denoiser?
Neither is universally better. Plugins like Neat Video keep you inside your NLE without exporting and reimporting, while standalone tools like UniFab Denoise AI offer dedicated batch processing built for volume.
Should I Denoise Audio and Video Separately?
Yes. Visual denoisers don’t touch your audio track, so pair your video tool with an audio cleanup tool like ElevenLabs’ voice isolator or Adobe Enhance Speech for a fully clean final export.
How Do I Compare AI Denoising Tools Before Buying?
Test each tool on your own short clip, not a vendor’s demo reel, and check playback during motion for flicker or smearing. Techvideoblog’s verified reviews compare pricing and real output quality across the category.