
Learn when burned-in captions suit your video, how they differ from closed captions and what to check before exporting. Use a clip with names, punctuation and a change of speaker. Correct the transcript, watch the timing, and check readability on a phone. Export the subtitle format you actually need before paying for a plan.
Research guide. Vendor information and third-party reports are distinct from our own test results. See how we evaluate tools. We may earn a commission from qualifying purchases through affiliate links. Affiliate disclosure.
Key Takeaways
Both open and closed captions can support accessibility. Check accuracy, timing, meaningful sounds and the delivery requirements for this project.
| Point | Details |
|---|---|
| Use burned-in for social reach | Hard subs survive platform stripping, downloads, and cross-posts on TikTok, Instagram, and Snapchat. |
| Always keep a sidecar file | Export an SRT/VTT alongside every burned-in MP4 for accessibility, SEO, and future edits. |
| Both open and closed captions can support accessibility. Check accuracy, timing, meaningful sounds and the delivery requirements for this project. | Both open and closed captions can support accessibility. Check accuracy, timing, meaningful sounds and the delivery requirements for this project. |
| Style for mobile first | Use 28-32pt sans-serif, a semi-opaque background or outline, and keep captions within the platform safe zone. |
| TechVideoBlog tool directory | Use the directory to compare workflow options, then confirm current features and terms with the provider. |
Table of Contents
- What are burned-in captions, exactly?
- Why burned-in captions win on social platforms
- Caption Accessibility: Check the Content and the Player
- Burned-in vs. closed captions: a quick decision guide
- How to burn in captions using FFmpeg, Premiere Pro, Final Cut Pro, and HandBrake
- Styling and rendering tips for readable captions
- Archival workflow: masters, sidecars, and distribution outputs
- Pre-export QA checklist for burned-in files
- Caption Accessibility: Check the Content and the Player
- How to Evaluate This Workflow
- TechVideoBlog’s curated tool guides for caption workflows
- Sources
- FAQ
What are burned-in captions, exactly?
The industry terms for this technique include open captions, hardcoded subtitles, hard subs, and hardsubs. All refer to the same thing: caption text that has been composited directly into the video frame as image pixels. Netflix Partner Help defines burned-in subtitles as subtitles rendered into the picture of the primary video asset, which is the clearest studio-level description of what the format actually is.
The contrast with closed captions is fundamental. Closed captions (delivered as SRT, VTT, or SCC sidecar files) are metadata. A player reads that file and overlays text at runtime, so the viewer can toggle them on or off, resize them, or change their color. Burned-in captions carry none of that flexibility.
The irreversible nature of the format is the key operational fact. Once captions are burned in, correcting a typo or adjusting timing means re-rendering the entire video. Treat every burned-in export as a distribution derivative, not your master file.
Why burned-in captions win on social platforms
Short-form social is where hard subs earn their place. Platforms like TikTok, Instagram Reels, and Snapchat autoplay video muted, and their native caption support is inconsistent. A sidecar file that works on YouTube may be stripped entirely on Instagram. Burned-in captions survive that stripping because they are part of the image.
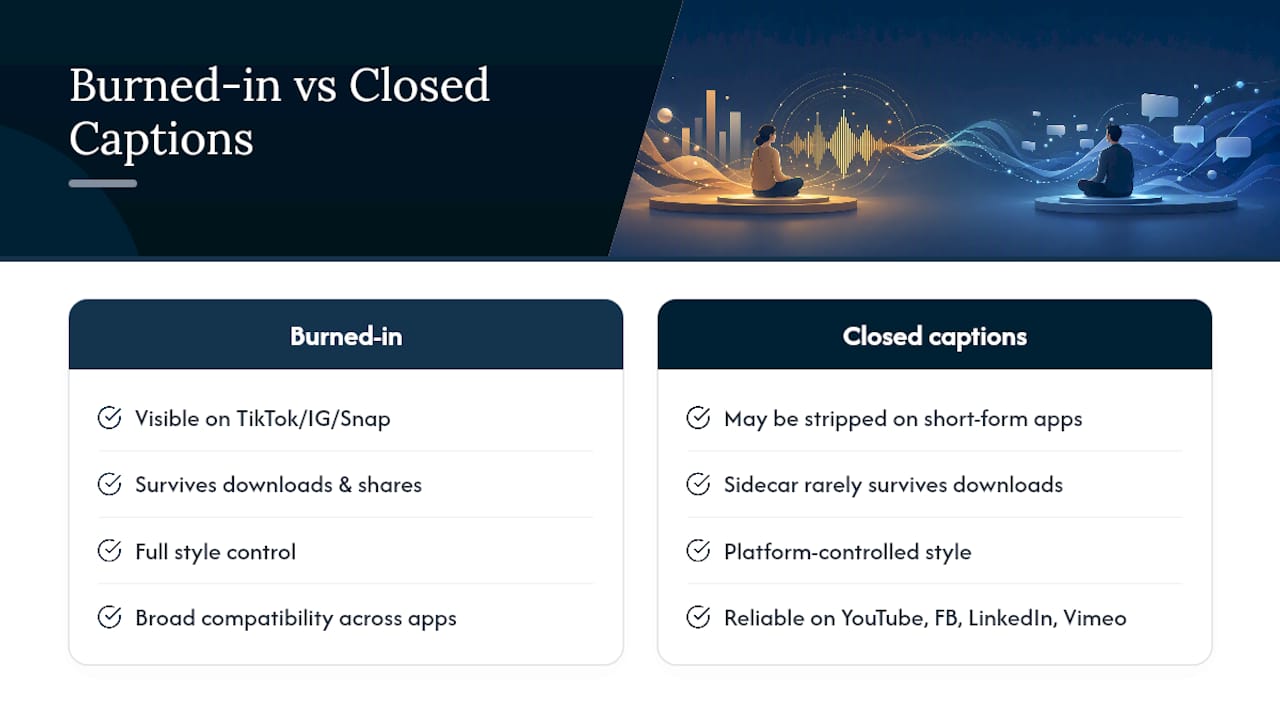
They also survive downloads and cross-posts. When a viewer saves your Reel to their camera roll or a colleague shares your clip via Slack or AirDrop, the captions travel with the file. Sidecar tracks almost never do.
Brand control is another real advantage. With hard subs, you choose the font, color, weight, animation, and exact position. Every platform shows your captions exactly as you designed them, not whatever default style the player applies to a closed-caption track.
Pro Tip: For social clips, encode your burned-in MP4 with H.264 and AAC audio. That codec combination gives the broadest compatibility across social upload pipelines and avoids transcoding artifacts that can blur caption text.
The University of South Carolina’s Digital Accessibility guidance identifies Instagram, TikTok, and Snapchat as platforms with inconsistent native caption support, which is precisely why burned-in captions are the preferred approach for those channels. YouTube, Facebook, LinkedIn, and Vimeo support closed captions reliably, so sidecar files work well there.
Caption Accessibility: Check the Content and the Player
W3C lists both open and closed captions as techniques for prerecorded captions under WCAG 1.2.2. Include speech, speaker identification and meaningful sounds, with accurate timing. A caption file alone does not establish overall legal compliance. Read W3C guidance. Confirm any additional delivery requirements with the organization receiving your video.
Burned-in vs. closed captions: a quick decision guide
| Feature | Burned-in (hard) captions | Closed (soft) captions |
|---|---|---|
| Primary use case | Social short-form, guaranteed display | Long-form, web, accessibility-sensitive content |
| Toggleability | Permanent, cannot be turned off | Viewer can enable or disable |
| Accessibility impact | Both open and closed captions can support accessibility. Check accuracy, timing, meaningful sounds and the delivery requirements for this project. | Both open and closed captions can support accessibility. Check accuracy, timing, meaningful sounds and the delivery requirements for this project. |
| Styling control | Full control at export time | Limited to player defaults unless CSS overrides |
| Processing time | Requires full re-encode | Sidecar copy often faster; no re-encode needed |
Pros of burned-in captions:
- Guaranteed display on any player, regardless of caption support
- Survives downloads, cross-posts, and platform stripping
- Full brand typography and animation control
- No dependency on viewer enabling captions
Cons of burned-in captions:
- Cannot be toggled off by viewers who do not need them
- Not machine-readable; invisible to search engines and screen readers
- Correcting errors requires a full re-render
- Adds re-encoding time to every export
The decision rule is straightforward: pick burned-in when the player is outside your control and reach matters most. Pick closed captions when accessibility, translation into multiple languages, or future edits are priorities.
How to burn in captions using FFmpeg, Premiere Pro, Final Cut Pro, and HandBrake
Before touching any tool, run through this starter checklist:
- Final edit locked and approved
- Accurate transcript or SRT/ASS file produced and spell-checked
- Caption style (font, size, color) decided
- Safe area verified (captions positioned above platform UI elements)
FFmpeg
FFmpeg is the most flexible option and handles batch workflows well. FFmpeg supports burning SRT or ASS subtitles into video using the -vf subtitles or -vf ass filters. ASS preserves advanced styling; SRT is simpler but carries limited formatting.
Basic SRT burn-in:
ffmpeg -i input.mp4 -vf subtitles=subtitle.srt output.mp4
ASS burn-in (preserves font, color, positioning):
ffmpeg -i input.mp4 -vf ass=subtitle.ass output.mp4
The FFmpeg wiki notes that converting ASS/SSA styling to MP4’s mov_text format loses style information entirely. If branded styling matters, burn the ASS file directly rather than converting to mov_text. Common pitfalls include missing font paths (specify with fontsdir in the ASS filter) and character encoding errors on Windows (use UTF-8 throughout).
Adobe Premiere Pro
- Open your sequence and create or import a captions track (File › New › Captions, or import an SRT via the Captions panel).
- Style the captions in the Captions panel: font, size, color, background opacity.
- Go to File › Export › Media.
- In the Export Settings dialog, open the Captions tab.
- Choose “Burn Captions Into Video” to embed them permanently, or “Create Sidecar File” to export a separate file.
Adobe’s export captions settings let you switch between these two outputs without changing any other export parameter, which makes it easy to produce both versions in one session.
Final Cut Pro
- Add a captions track via Edit › Captions › Add Caption.
- Style each caption in the Inspector panel.
- Go to File › Share › Export File (or use Roles).
- In the export dialog, select “Burn Captions into Video” under the captions role options to embed them, or export a sidecar by choosing the separate caption role output.
HandBrake
- Open your source file in HandBrake.
- Click the Subtitles tab.
- Add your subtitle track and check the “Burn In” checkbox.
- Set your video encoder and output format, then click Start Encode.
HandBrake’s Burn In option permanently renders subtitles into the exported video and requires a full re-encode. Expect export time to run longer than a simple container copy, particularly at higher resolutions.
Pro Tip: For AI-generated subtitle files before burning in, check the timing on a few random lines at 1x playback speed. AI transcription is fast but occasionally drifts on fast speech or accented speakers. Fixing the SRT takes seconds; re-rendering after a bad burn-in does not.
Styling and rendering tips for readable captions
Legibility on a 6-inch phone screen is the real test, not how captions look in your editing timeline.
- Font: Use a clean sans-serif such as Arial, Helvetica, or a purpose-built caption font. Decorative or serif fonts degrade at small sizes.
- Minimum size: 28-32pt at 1080p is a practical floor for mobile readability. Scale proportionally for 4K or 720p outputs.
- Contrast: White text with a semi-opaque black box or a 2-3px black outline provides reliable contrast across light and dark backgrounds. Pure white on a bright background fails immediately.
- Safe area: Keep captions within the bottom 10-20% of the frame but above the lowest 8-10% to avoid platform UI overlays (like TikTok’s like/share buttons or Instagram’s username bar).
- Line length: Aim for 32-42 characters per line, maximum two lines on screen at once.
- Reading pace: A comfortable reading pace is roughly 130-150 words per minute for captions. Avoid holding a single caption card longer than 7 seconds or shorter than 1 second.
Multi-language note: If you need captions in more than one language, export a separate burned-in file per language rather than stacking languages on screen. For multilingual distribution at scale, sidecars are the better architecture: one master video, multiple SRT files, no re-renders.
For ASS/SSA subtitle styling, advanced positioning and per-line color changes render faithfully when burned in via FFmpeg’s ass filter. SRT supports only basic bold, italic, and color tags, and even those may be stripped depending on the player that generated the SRT.
Archival workflow: masters, sidecars, and distribution outputs
A clean archival workflow prevents the most common burned-in caption mistake: losing the ability to edit or translate a video because the only copy has captions baked in.
Master assets to keep for every project:
- Clean master video file (no captions, no lower thirds burned in)
- Editable project file (.prproj, .fcpbundle, or equivalent)
- Canonical SRT/VTT/ASS per language, stored alongside the project
- Full transcript as a text file or CMS entry
Export plan:
- Export a burned-in MP4 (H.264/AAC) for TikTok, Instagram Reels, YouTube Shorts, and any cross-posted social clips.
- Export a clean MP4 plus sidecar SRT for YouTube long-form, your website player, and LinkedIn.
- Archive the master project and all caption files with consistent naming (e.g.,
projectname_v1_en.srt).
Practitioners describe burning-in as a destructive workflow step, and the framing is accurate. Every burned-in file is a derivative, not a source. Treat it that way in your folder structure.
Pro Tip: Save your burned-in export settings as a render preset in Premiere Pro or a HandBrake preset. Consistent codec settings across a series prevent the subtle quality drift that happens when settings are dialed in manually each time.
Pre-export QA checklist for burned-in files
Run through this before every render:
- Final transcript reviewed and approved by whoever owns the content
- Spell-check and grammar check completed on the SRT/ASS source file
- Safe zone verified in the editing timeline at 9:16 and 16:9 aspect ratios if cross-posting
- Font and color contrast tested against both light and dark background frames in the video
- Language accuracy confirmed (especially for proper nouns, brand names, and technical terms)
- Export preset selected and output folder set correctly
- Test export of a 30-second segment reviewed on a mobile device before full render
- Full render reviewed on mobile (iOS and Android if possible) and in a desktop player
Keep the clean master and sidecar files in the same project folder before archiving. A burned-in export with no accompanying SRT is a liability the moment a translation request or accessibility audit arrives.
Pro Tip: Export a 30-second test clip at full quality settings before committing to a full render. Catching a font path error or a contrast issue on a short clip saves the time of re-rendering a 20-minute video.
Caption Accessibility: Check the Content and the Player
W3C lists both open and closed captions as techniques for prerecorded captions under WCAG 1.2.2. Include speech, speaker identification and meaningful sounds, with accurate timing. A caption file alone does not establish overall legal compliance. Read W3C guidance. Confirm any additional delivery requirements with the organization receiving your video.
How to Evaluate This Workflow
Use a clip with names, punctuation and a change of speaker. Correct the transcript, watch the timing, and check readability on a phone. Export the subtitle format you actually need before paying for a plan.
This is a suggested evaluation process, not a report of a completed TechVideoBlog benchmark.

TechVideoBlog’s curated tool guides for caption workflows
Sources
The sources below cover official technical documentation, accessibility standards, and platform-specific guidance for burned-in caption workflows.
- Open vs. Closed Captions – Digital Accessibility | University of South Carolina
- Add subtitles to video – Adobe
- HowToBurnSubtitlesIntoVideo – FFmpeg wiki
FAQ
What does “burned-in captions” mean?
Burned-in captions are caption text permanently rendered into the video pixels, so they display on every player without requiring the viewer to enable a caption track. They are also called open captions, hardcoded subtitles, or hard subs.
Are subtitles “burned in” or “burnt in”?
Both spellings appear in practice, but “burned in” is the standard American English form used in technical documentation by Adobe, HandBrake, and FFmpeg.
How do I burn in subtitles with FFmpeg?
Run ffmpeg -i input.mp4 -vf subtitles=subtitle.srt output.mp4 for a basic SRT burn-in, or use -vf ass=subtitle.ass to preserve advanced styling. Both commands require a full re-encode of the video.
Do burned-in captions count for ADA or Section 508 compliance?
Both open and closed captions can support accessibility. Check accuracy, timing, meaningful sounds and the delivery requirements for this project.
Where can I find tested AI tools for generating SRT files before burning in?
Recommended
- AI Captions & Subtitles – TechVideoBlog
- AI Tool Guides – TechVideoBlog
- Best Free AI Caption Tools
- AI Caption Tools